Showing posts with label in. Show all posts
Showing posts with label in. Show all posts
Monday, February 24, 2014
Retro in Black and White
Lately it seems all my work is being done on mid-century pieces. I went up a few decades and
wandered into the 70s. Ah yes, the wonderful 70s. Great times.
But dreadful clothing and furniture! Behold the common dresser:


But these do clean up nicely!!!

I would like to give a shout out to Dionne over at The Turquoise Iris for this inspiration.
I saw one she did in black and white that was just beautiful! She always does such unique work.


I used a semi-gloss in both the white and the black. But I had the hardest time getting the top
to smooth out. I used a Sherwin Williams acrylic and painted at least 3-4 coats. Was not happy.

I sanded between coats but just could not get his smooth. So I completely sanded it off and started over.
This time I used a BM black. Much better.

The handles were sprayed with carbon mist and highlighted w/gold gilding wax.

And of course there always has to be a little surprise detail when you look behind the door.


Viola
Linking up at my fave parties!! :
Kammys Korner - Trash to Treasure Tuesdays
Domestically Speaking - The Power of Paint Party
The Shabby Creek Cottage - Transformation Thursday
Miss Mustardseed - Furniture Feature Friday
Redoux - Friday Link Up Party
Homespun Happenings - Rustic Restorations Weekend
Funky Junk Interiors - Saturday Night Special
1929 Charmer - Sundays Best Party
Knick of Time Interiors - Knick of Time Tuesday
Elizabeth and Co., My uncommon Slice of Suburbia,
Savvy Southern Style. Weds, Beyond the Picket Fence, PJH Designs
From my Front Porch to Yours, The 36th Avenue,
Between Naps on the Porch
The Dedicated House,-Mon
Redoux

Friday, February 14, 2014
Sylvania Ohio built in Step 3
Its time to make the upper cabinet. This is going to be a full 8 wide cabinet, by 18" high. By using 1/4" painted birch for the back, it will keep the weight down. I start by constructing the box, and allow for the trim on the ends. Again, you will want to make sure the unit is square before completely nailing it together. Ive also used glue, as needed.

I am going to hang the cabinet using a french cleat. This is a board, ripped down the center on a 45. I can mount one of the halves to the wall, anchoring it to the studs and making sure it is level. The other half is mounted to the back of the cabinet. The cabinet can then be easily installed in one smooth step, eliminating the need to hold it in place while trying to screw it into a stud. French cleats are great ways to hang cabinets!


Ive attached the bottom apron to the cabinet to allow proper centering between the windows...

Read More..
I am going to hang the cabinet using a french cleat. This is a board, ripped down the center on a 45. I can mount one of the halves to the wall, anchoring it to the studs and making sure it is level. The other half is mounted to the back of the cabinet. The cabinet can then be easily installed in one smooth step, eliminating the need to hold it in place while trying to screw it into a stud. French cleats are great ways to hang cabinets!
Ive attached the bottom apron to the cabinet to allow proper centering between the windows...
Saturday, January 25, 2014
Small Investment In A Dream

Caulking irons.
One day I WILL build a boat...
In the meantime, I enjoy watching Bob Easton build his Fiddlehead.
Thursday, January 23, 2014
Custom Teenagers Built In Bookcase Storage Unit
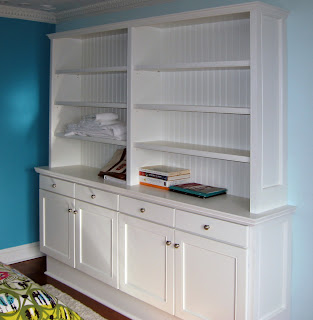
This storage unit is built and painted with no-VOC materials for a healthy environment.
Subscribe to:
Posts (Atom)